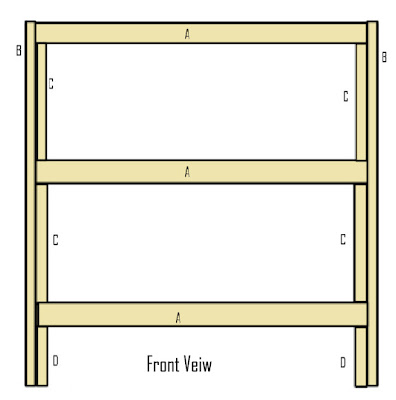
 The supply list for mine includes only 8 2"x4"x8' boards and approx 70 3" galvanized exterior screws.
 The cut boards are labeled on the drawing. Their lengths are listed below. Now I only have a 36" wide space to use so I will not be able to fit 3 ten gallon tanks on the lower two shelves. If you want to make yours hold 3 tens on each shelf, extend boards A and E two inches longer. This will give you a tiny bit of space between each tank as well. Alternately you could put fifteen gallon talls on the top shelf just as easily as tens. I don't really care for the added height though.
A - 33" need 6
B - 48' need 4
C - 16.5" need 8
D - 4.5" need 4
E - 30" need 3
F - 21" need 6
When cutting the boards, figure out the best use of each 8' board so that you do not have much waste. Here is how I will cut mine. Yours may need to be different depending on if you have spare boards laying around or if you choose to extend the rack the extra 2" wide. You will need to be precise. If this is your first project, it may be wise to purchase or find an extra board or two just in case.
2 - cut in half for two 48" boards each
3 - cut two at 33" and the last piece will be 30"
2 - cut four at 16.5", two at 4.5", and the last will be 21"
1 - cut four at 21" and put that last 12" piece away and save it for a future project.
No comments:
Post a Comment